Need assistance?
Do you need help with the CMS or Locatify apps? Fill out our form and we’ll get back to you as soon as possible!
Tutorial Videos
How to Make an Outdoor Tour
How to Make an Outdoor Game
How to Make an Indoor Project with iBeacons
How to Make an Indoor Project without Location Technology
Step-by-Step Guides
Create a Treasure Hunt Game

Create a Tour Guide
Create an Indoor Tour or Game
Frequently Asked Questions
- All
- Plans & Pricing
- Treasure Hunt Games
- Indoor Positioning
- Creator CMS®
- Tutorial Videos
- Branded Apps
- App Store
- TurfHunt
- SmartGuide
- Indoor Projects
- Tour Guides
- Accounts
This type of challenge enables you to quiz players on their memory by getting them to pair images within a certain time period.
1. Create a treasure point
Firstly, create a treasure point. Then click on the treasure point to add a challenge to it.

2. Select memory challenge
Add a challenge then select “Memory Game”.

3. Attribute a score to your question
Then choose how difficult you want it to be from Easy, Medium & Hard.

4. Add more challenges
Select the Add Challenge button to add as many more challenges as you want!

Now when somebody comes within range of your treasure point during a game, this game will be automatically triggered and the game player required to complete the challenge!
Make sure to test that it works as you need it to by making a test version of your game and testing it on the app.
This type of challenge enables you to judge players based on which photo they take and how they decorate it.
1. Create a treasure point
Firstly, create a treasure point. Then click on the treasure point to add a challenge to it.
2. Select take photo
Add a challenge then select “Take Photo”.

3. Choose a sub type
Choose from getting your players to decorate their photo with drawings, stickers or to keep it plain.

4. Choose your challenge settings
Choose the amount of points to give the completed challenge, the instructions, a completion message and upload a canvas.

Note: If you want your players to use stickers on their photos, you’ll need to upload them here.
Now when somebody comes within range of your treasure point during a game, this game will be automatically triggered and the game player required to complete the challenge!
Make sure to test that it works as you need it to by making a test version of your game and testing it on the app.
1. Download the SmartGuide app to your phone or tablet
To test your game you’ll need to firstly download the Locatify SmartGuide app from the Apple App Store or Google Play store.
2. Press publish
From within your project in the Locatify Creator CMS, click publish. This will take you to a testing window.

3. Select Test on Device
From within the publish window, press test on device and follow the instructions.

4. Enter Invitation Code
From within the app, select Invitation Code and use the QR code or invitation Code provided to install the test project on your device.
This type of challenge enables players to draw a picture on a blank canvas or photo canvas.
1. Create a treasure point
Firstly, create a treasure point. Then click on the treasure point to add a challenge to it.
2. Add a challenge
Add a challenge and select “Draw challenge”.

3. Choose your challenge settings
Specify the amount of points to give for completing the challenge, select language, add instructions, a completion message and upload a canvas (optional).

Note: You can add and manage extra languages for your game in Project Settings and add or remove translations for each challenge when adding a challenge.
Now when a player comes within the range of your treasure point during a game, this challenge will be automatically triggered and the game player required to complete the challenge!
1. Download the app to your phone or tablet
To test your game you’ll need to firstly download the Turf Hunt app from the Apple App Store or Google Play store.
2. Press publish
From within your project in the Locatify Creator CMS, click publish. This will take you to a testing window.
3. Select Test on Device
From within the publish window, press test on device and follow the instructions.
4. Enter Invitation Code
From within the app, select Invitation Code and use the QR code or invitation Code provided to install the test project on your device.
Treasure points are locations that trigger information when a player is within radius of the location. You can add interesting information, media and challenges to each point.
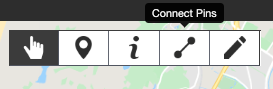
You can also connect treasure points together to hide the locations from the map. Connecting points means players must find the locations in a sequential manner, and only the next location will be shown once a challenge is completed.
1. Find yourself
Not your life purpose, just the position of where you want the game on the map. Use either the search function or pan and zoom to find your first treasure location.

2. Add a treasure point
Create a treasure point and then click on the pin, or treasure point alias in the left menu to add information to it
3. Edit your point content
Add audio, an image, text description. You can also add other languages or use HTML templates to further customise the content in your treasure point.

4. Set your triggering location and radius
Specify the size of the radius which will trigger the challenge when the player enters the radius. If you know the specific latitude and longitude of your treasure location, you can manually set this (optional). When setting your radius, keep in mind the limitation of GPS when close to large buildings or trees.

This type of challenge enables you to quiz players knowledge with questions and set a score for a correct answer.
1. Create a treasure point
Click on the treasure point then add a challenge to it.
2. Add a question challenge
Select Question Challenge

3. Attribute a score to your question
Then click on Select a Question to add a question to your challenge.

4. Select the type of question
Select the type of question, the language/s and then write your question.

4. Add extra languages, write questions, hints and answers. You can also upload images by clicking on the images icons.

Now when somebody comes within range of your treasure point during a game, this question will be automatically triggered and the game player required to complete the challenge!
Make sure to test that it works as you need it to by making a test version of your game and testing it on the app.
Downloading a published game
Once you have downloaded the TurfHunt app you will be presented with a map with different game locations shown. You can click on a marker on the map to view more information about that game, or can switch to a list view of games.
Once you have chosen your game, select the desired language and download the game. Please note some games may have a large file download due to the rich multimedia content so it is recommended to use WiFi when possible.
Some of the games are free while others are available for a small fee which is payable using the default app store payment options. Once you have made your selection, the tour is downloaded onto your device. You can re-download the tours at a later time if need be.
If you lose a network connection while downloading a tour, you can always restart the download once you have a network connection again.
Downloading a game via Invitation Code
Find the “Redeem Invitation” code at the bottom of the TurfHunt home screen (or from the menu) and enter the invitation code that has been provided. This code will then install the correct game onto your device.
1. How to join a game
There are three ways to join a game.
a) Select a game from the map

b) Select game from list

c) Join with Invitation/QR Code

2. Select language and start the game
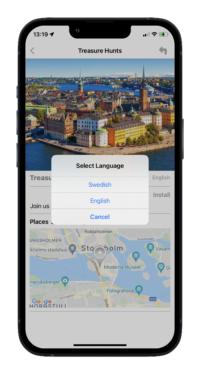
Here you will see further info about the game; the title, description, logo, how many treasure points there are and how many challenges are in the game, as well as the language.
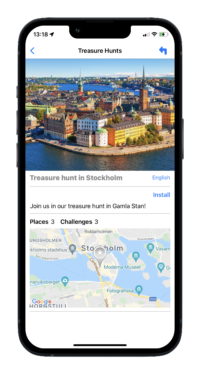
If you press on the language on the right side of the screen you will see which languages the game is available in. Select the language you want to use and then press “install” (this will download game content).
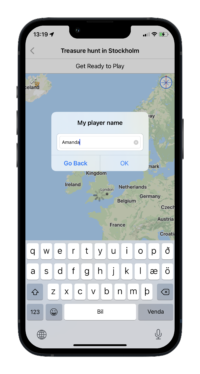
3. Enter your player or team’s name
4. Share the invitation code with others
Every player will enter the same code for the same game. The other teams enter the code in “Redeem Invitation” on the front page.
5. It is time to play when all the teams have signed in
The one who invited the others starts the game – Press start game now
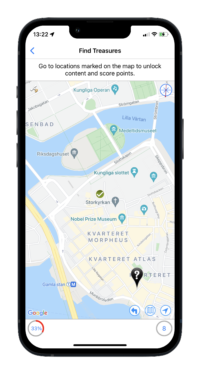
6. Find treasures and solve challenges
On this screen, you will see the map and see where the next treasure is located. If the game has been designed in a way that there are no routes between the treasures then all the treasures will appear at once, but a game with trails connected treasures will only show the first treasure location. Go to the location and the challenge will automatically appear on the phone once the player is in range of the treasure.
You are the blue dot on the map, the others are green. During the game, the player sees his scores right away in the lower right corner on the map.
7. Complete challenges to earn a score
There are different types of challenges the game publisher can use when he sets up a challenge at a treasure point. A treasure can have one or more challenges and the player is rewarded with virtual gold coins and game items. When a user discovers a treasure, he will be presented with a challenge. There are different types of question challenges, photo challenges, draw challenges, and memory card games. There are three levels of memory games; easy, medium, and hard. The boards are different and the player is given a certain time to finish the task, the seconds count down as he flips the cards.
The game publisher decides how many points the player gets in rewards. He can also give vouchers to the players as rewards for finishing certain challenges or getting a certain amount of points.
8. End game
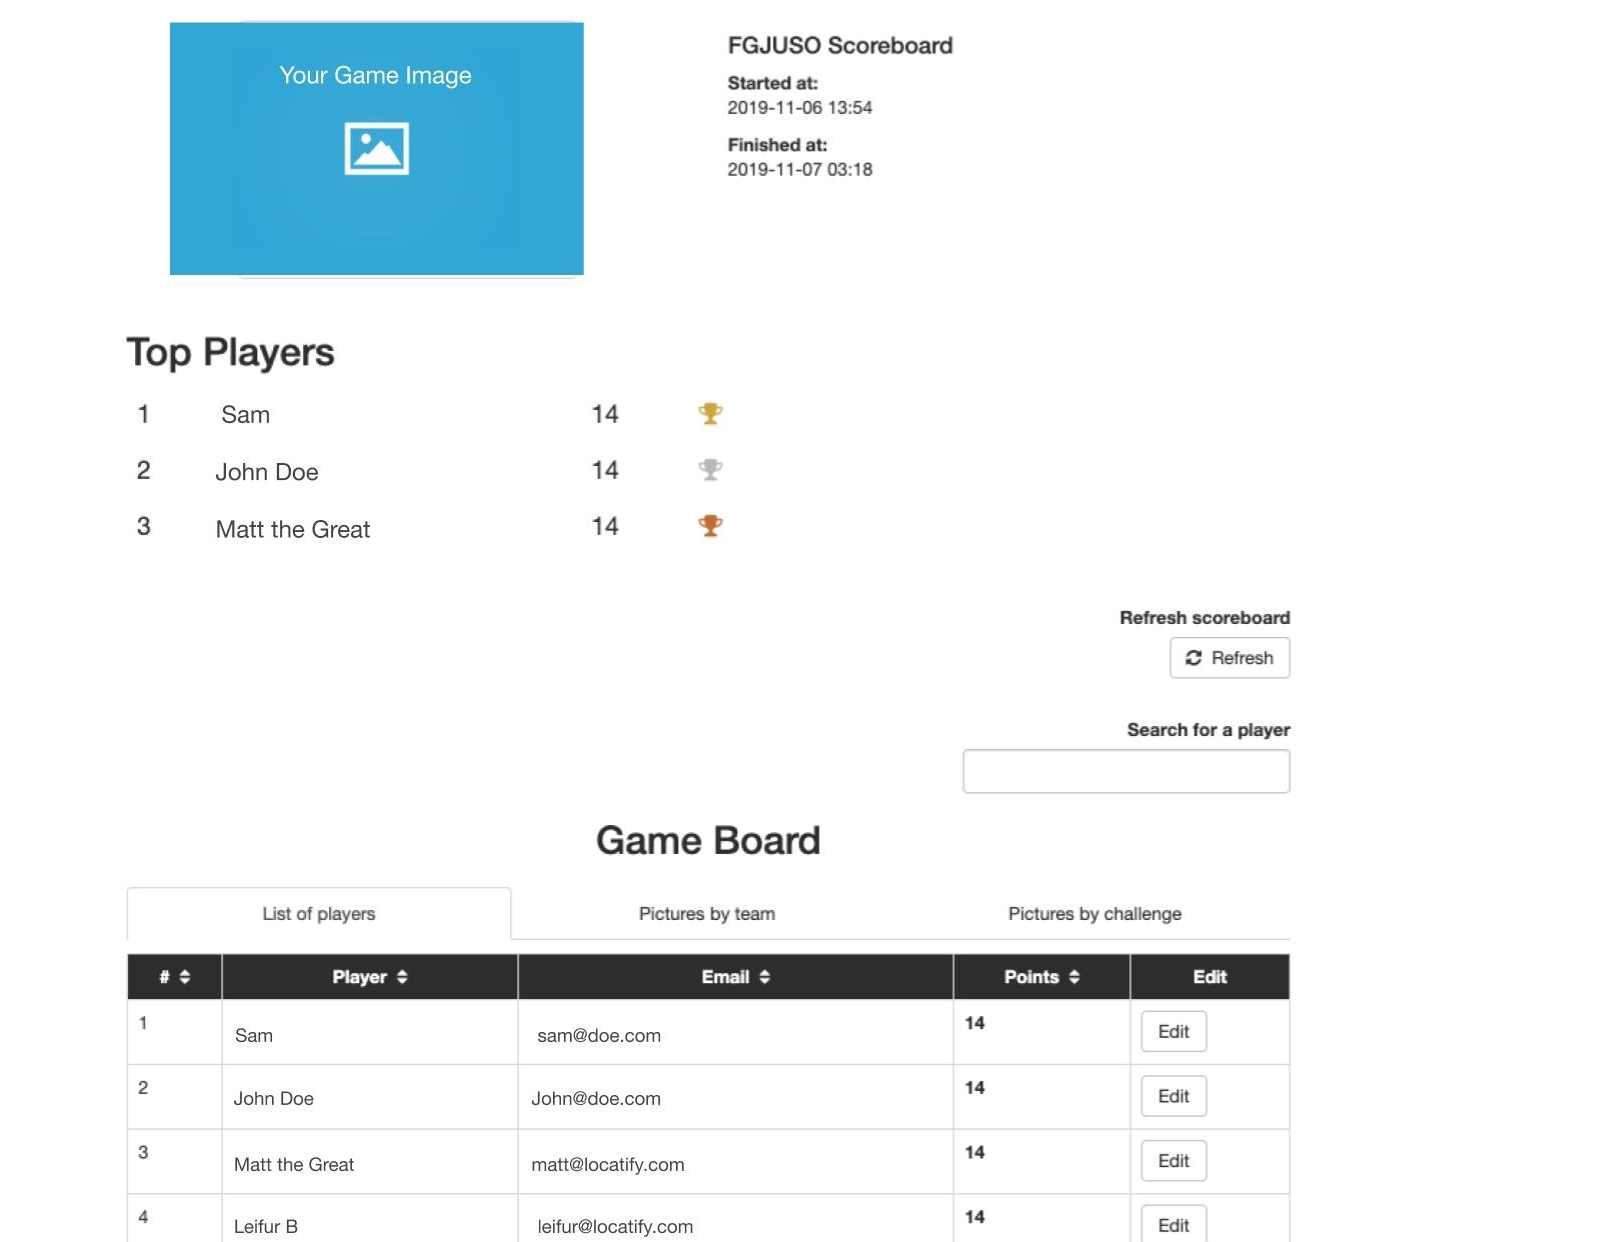
The scoreboard shows all teams’ scores, how many challenges have been solved, and the scores for each one. The game can be ended from this screen.

The App Store is Apple’s web-store for finding and downloading Apple iPad and iOS apps.
The Google Play Store is Android’s web-store for finding and downloading Android mobile apps.
(This article is about Branded apps. For more information on getting your own branded app, see here)
Yes, we recommend you use your own accounts or set up a new account. We will provide the app binary files and assist with setting up and publishing apps to your own developer accounts.
Apple App Store Connect developer account is currently between $99 USD annually and $299 USD for enterprise accounts with multiple apps. Google Play Store developer accounts are $25 USD once off.
Learn more about App Store Connect developer accounts here and Google Play Store developer accounts here.
The main reason you would setup your own accounts is if you want to accept in-app purchases. Other reasons could include if you want to control and update the app store listing yourself or if you don’t want your competitors to know who created your app.
(This article is about Branded apps. For more information on getting your own branded app, see here)
If you do not intend to accept in-app purchases, you can use Locatify’s developer account to publish your app to the App Store and Play Store for a fee. Locatify is a trusted developer with years of experiences and dozens of published apps. Because of this, new apps are usually approved for publication much quicker than with new developer accounts.
Other benefits include simplicity of publication process and automatic app updates for future Operating System (OS) updates.
However, if you want to accept in-app purchases you will need to set up your own developer account.
Learn more about App Store Connect developer accounts here and Google Play Store developer accounts here.
(This article is about Branded apps. For more information on getting your own branded app, see here)
In-app purchases are the most common method for monetising app content. You can sell access to both Android and iOS apps and specific in-app content such as a Tour or Game, using in-app purchases. In-app purchases are only available for Branded App customers only and require your own App Store connect and google play Store developer accounts.
We can assist with setting these accounts up. For more information on in-app purchases and app monetisation, see the Apple guidelines and Google guidelines.
BLE stands for Bluetooth Low Energy and refers to small wireless “beacon” devices which use minimal power and send frequent Bluetooth signals.. The beacon signals can be picked up by smart phones and used for determining proximity to something or for identifying a users location.
For detailed information on BLE Beacons, see our blog.
Ultra-wideband or UWB refers to a spectrum of radio signals which can be used for accurate indoor positioning down to 30cm accuracy. UWB requires slightly more hardware than BLE beacons, but provides a much higher level of accuracy and frequency of positioning updates

Learn more about UWB for Indoor Positioning here.
Whether to use BLE or UWB for your indoor positioning project will depend on a number of factors. The main considerations are budget, positioning accuracy, latency requirements, and the ability to provide/attach a UWB tag to the tracked object, compared with using a mobile device as the tracked object.
The short answer is that UWB requires more infrastructure, costs more and provides a much higher level of positioning accuracy. It is important to weight the benefits of each and you can learn more about the differences in this blog post here.
iBeacon™ is a trademark registered by Apple and refers to how Apple’s iOS devices detect beacons. Apple was the first smartphone manufacturer to include BLE in their iOS operating system as iBeacon which is a software extension of the BLE protocol. While BLE defines the data transmitted and the RSSI signal strength, iOS calculates the actual distance and delivers to the application the calculated values so the developer does not have to rely on RSSI calculations. Android programmers don’t have that luxury and have to base their distance calculations on the RSSI signal which can vary depending on manufacturer of the device.
At hardware level, beacons are BLE devices broadcasting data. At software level, beacons are messages sent by broadcasting devices, that are then detected and processed by receiver devices, like a mobile app running on iOS. These data are considered beacons as well, depending on how you name things.
TurfHunt is a location-based treasure hunt game app that makes it possible for anyone to create and play treasure hunt games. The app brings the traditional paper and map based scavenger hunt game into the 21st century using modern mobile and location technology.
The games are created using Locatify’s Creator CMS platform and are played on mobile devices. The games can be played as single player or multiplayer games (with scoreboard) and feature multiple challenge types and game play modes.
Outdoor games use GPS and google maps to trigger challenge locations and indoor games uses floor maps and BLE Beacons.
Learn more about TurfHunt Treasure Hunt Game app here.
Locatify SmartGuide app is a tour guide app designed for narration and guidance on mobile devices. The tours are professionally created by organizations that want to provide location-based guide services to their audiences.
The tours are created using the Locatify Creator CMS platform and can be used outdoors with GPS or BLE Beacon content triggering, or indoors with BLE Beacons, UWB, or a floor map only.
Locatify SmartGuide is suitable for individuals or organizations who would like to publish professional digital tour guides for use on mobile devices, but do not require their own custom branded app. Common examples are city walking tours, museum audio guides, boat and bus tours, trade fair guides, and cycling tours.
All tour guides can be produced with multi-lingual content and can be enjoyed “offline” without an internet connection once they have been downloaded to a user’s device.
Learn more about Locatify SmartGuide here
We recommend using either Kontakt.io or Estimote beacons for best performance and price. They both use the same chipset but package them differently. Kontakt.io beacons are plain and durable with a replaceable CC battery, while Estimote beacons are in a designer-made case and have a 3 year battery life. Beacon price depends on the number of beacons required and the features of the beacons, but are generally €20-€30 each.
For large installations, Locatify can provide beacons directly at partner pricing, and for indoor project testing purposes, we suggest:
There are multiple UWB providers, each with different pros, cons, and techniques. Locatify searched far and wide and has partnered with a leading industry manufacturer to directly supply UWB hardware and software.
UWB hardware (anchors) and software cost can be roughly estimated at €10 per m2 or $10 per 10 sq ft. This estimate does not include installation cost, ethernet infrastructure, and UWB tracking tags which are all quantity and time dependant. This €10 per m2 is a ballpark estimate and increases when projects have multiple floors or complex environments with signal blocking objects which can increase the total number of anchors requires.
Contact us to discuss your project requirements, request a demo kit, or get a quote.
TurfHunt is available for Android and iOS devices, and is compatible with:
- Apple iPhone iOS version 10.0 through to the latest operating system (iOS)
- Android version 4.3 through to the latest Android operating system (OS)
- Apple iPad’s with mobile network connectivity/sim card (WiFi-only models are not compatible with games)
Please note: Mobile devices must have some spare memory to operate effectively and some older devices may function differently. For example:
- Background-location-detection is restricted on some older devices
- Augmented Reality capability is limited to modern devices
- Bluetooth scanning frequency might be reduced on some operating systems to improve battery life
The Locatify SmartGuide app is available for Android and iOS devices and is compatible with:
- Apple iPhone iOS version 4.0 through til iOS 13
- Android version 4.3 through to the latest Android operating system (OS)
- Apple iPad’s with 3G/4G connectivity / sim card (WiFi-only models are not compatible for games)
Please note: Mobile devices must have some spare memory to operate effectively and some older devices may function differently. For example:
- Background-location-detection is restricted on some older devices
- Augmented Reality capability is limited to modern devices
- Bluetooth scanning frequency might be reduced on some operating systems to improve battery life
An internet connection is only required to download the app and the tour you want to enjoy. Once the tour has been downloaded to the device, you do not need an internet connection for the tour to work. The tour audio, images and locations are pre-downloaded into your device from our servers.
Please note:
Some advanced features will not work without an internet connection. If using custom content templates with web based content, some web content may not display without an internet connection.
GPS is required for automatic triggering of outdoor tour points and Bluetooth must be switched on for automatic indoor triggering. Tour points or stations can be clicked on to reveal tour content, when no location technology is available.
An internet connection is only required to download the app and the game you want to play. Once the game has been downloaded to the device, you do not need an internet connection to play the game. The game challenges, audio, images and locations are pre-downloaded into your device from our servers.
Please note:
Some advanced game and scoreboard features will not work without an internet connection. Player score and uploaded content such as photo challenge content will not be uploaded to the scoreboard or games control panel until the player connects to the internet.
For multiplayer games, player locations will not be shared with each other without an internet connection. If using custom challenge or content templates with web based content, some web content may not display without an internet connection.
GPS is required for automatic triggering of outdoor challenge locations, and BLE Beacons and Bluetooth must be switched on for automatic indoor triggering.
The Locatify Creator CMS® is an easy to use content management system designed for creating and publishing location-based content to mobile apps. Common use cases include audio guides/ tour guides, treasure hunt games and proximity based triggering for events or marketing.
The Locatify Creator CMS® is a cloud based software tool developed by Locatify, rich in features and accessible via the browser. All Locatify built apps are connected to the Creator CMS®, allowing for real-time updates of app content.
The Creator CMS® works for both indoor and outdoor projects and is integrated with GPS, BLE Beacons, Ultra-wideband (UWB), Google Maps, Open StreetMaps and Custom Maps.
The Locatify Creator CMS® is accessible via browser and provides a system for easily building and publishing treasure hunt games, tour guides and other location-based app content, without any coding required.
How to start creating Indoor & Outdoor Experiences:
1) Signup for a Creator CMS® free account
2) Create a project
3) Test your project on a mobile device by publishing it for testing in either TurfHunt (if your project is an outside treasure hunt game) or SmartGuide (if your project is an inside or outside tour)
4) Publish your project on the free plan for up to 6 simultaneous users or upgrade to a premium license for more users and other premium features.
Not at all! The Creator CMS® is a user friendly tool designed to be as simple as possible. Most users will never need to write any code.
Some advanced features such as customising game challenges or tour content templates require some HTML / CSS programming knowledge. We can create custom challenges or content templates by request.
Any application that requires location-based delivery of content or tracking of mobile devices.
Applications can utilize beacons for indoor positioning by reading the proximate distance to individual beacons or by using trilaterion to determine the device (phones) precise 2D positon. Common examples of this include:
– Shopping apps displaying promotions specific to what is in front of the customer
– Point of sale payment applications and shopper loyalty programs
– Tracking user’s location for saftey
– Automatic media delivery in a museum
– Indoor navigation
Yes, GPS use will drain the battery quicker than usual. However, GPS is becoming increasingly more used in modern apps, and smartphone manufacturers are taking this into consideration with improved operating systems and battery life.
If you need to leave the game for whatever reason, the application will pause. For example, if you get a phone call mid-game, you can answer, and the game will resume when you end the call. The app will continue to run in the background and resumes if you switch back to the app. To save battery life the GPS is turned off when the screen is turned off.
Yes! It 100% does. You can upload floor plans to your project and add stations (zones) to them. Indoor projects are compatible with BLE Beacons, Ultra-wideband and also with clickable stations if no location-technology is used.
Once you have downloaded the SmartGuide app you will be presented with a list of downloadable tours. This is viewable as a list or as a map view to see tours close by.
Once you have chosen your tour, select the desired language and download the tour. Please note some tours may have a large file download due to the rich multimedia content so it is recommended to use WiFi when possible.
Some of the tours are free while others are available for a small fee which is payable using the default app store payment options. Once you have made your selection the tour is downloaded onto your device. You can re-download the tours at a later time if need be.
If you lose a network connection while downloading a tour, you can always restart the download once you have a network connection again.
No, the Creator CMS® only works with HTML5 compliant browsers. We DO NOT support non-HTML5 compliant browsers (i.e. Internet Explorer and Safari 5 or older).
In short, yes! Augmented Reality (AR) functionality is currently available with Branded Apps as a premium feature and is on the roadmap for 2022 for Locatify TurfHunt and SmartGuide Apps.
If you are interested in AR, please contact us to discuss your project requirements and pricing.
(This article is about Branded apps. For more information on getting your own branded app, see here)
Yes, all apps can be customised to your requests. White-label apps have standard brand-able elements, but apps can be fully customised to customer requests. Check out the app branding guidelines document for more info.
(Prefer to watch this tutorial? Click here!)
1. Add a station
(To first see How to add a Floor in an Inside Project, click here.)
Start by clicking on the + next to Stations on the left hand panel.
Now click again on the floor plan to place it where you want it, then click again on it to drag it to the right position and size it correctly.
2. Add content
Now scroll down to the Station content. Here you can:
- Name the station in the CMS.
- Upload your own custom active and inactive images that represent the station on the floor map.
- Add more languages.
- Give your station a title that will be visible to the users (this is required).
- Upload the audio guide for the station, it will start playing automatically when the station is activated.
And on to the information layout. Here you can choose to have the popup window display automatically when the station is activated. You can either use the default layout with only description text or click on Template and edit content to customise the look.
You’re done! Now click on save and close this station.

(This article is about Branded apps. For more information on getting your own branded app, see here)
Yes, we have a full-stack development team in-house for customizing apps to client requirements. Common requests include connecting to third-party services such as ticketing or weather, adding web content, or feedback surveys for example.
(This article is about Branded apps. For more information on getting your own branded app, see here)
You will need to set up a App Store and Play Store developer accounts for distribution to iOS and Android. For more information about App Store publication and in-app purchases, see the App Store / Play Store FAQ’s below.
If you do not intend to use in-app purchases, you can request that the app be published to the Locatify developer accounts.
Once apps have been published, deep-link URL’s and QR codes can be created to easily find and download your app. Links can be shared via the web or as a scannable QR code.
Background ambient audio will play throughout the entire tour and floor audio will only trigger automatically when the floor is triggered the first time. The floor audio can be manually played again when on that floor.
The minimum GPS radius is 5m and maximum is 300m.
The minimum GPS radius is 5m and maximum is 300m. We recommend using 15 meters as a minimum radius, 5 meters if no obstacles like tall buildings are blocking the signals.
There is no maximum number of points.
We do not apply a maximum limit for file size for tour content. We do advise to optimise all content such as MP3, MP4 and image files to minimise the tour download size.
No, unfortunately not. “WiFi-Only” iPad models are not compatible with outdoor treasure hunt games as games require GPS coverage to enable game play. Ensure you have a “WiFi + Cellular” model for playing games on Locatify apps. You can compare iPad models here.
BLE Beacons (iBeacons) are identified by three properties. They are: Major number, Minor number and UUID. The combination of these three numbers is unique for each device. The numbers are normally preset on the beacon and you simply enter them in the CMS when you register the beacons with our system. Alternatively, you can see these numbers in an app provided by your beacon supplier.
_iphone13midnight_portrait")
Yes you can. You can use the “Connect pins” tool to connect points in a sequential fashion. This means that the next point will not trigger until the previous point has been activated. This is particularly useful if your tour has points close together, for example on the same road, where you need to specify which point to trigger in first.
BLE Beacons and UWB have clear pros and cons for each, ranging from hardware requirements, cost and technical feasibility. Learn about the differences of BLE Beacons vs. Ultra-wideband (UWB) for indoor positioning here.
If you have an iPhone on the same Apple account, then select Restore Purchases from menu accessible from the front page top-left button.
If you have Android, you need a code to redeem the purchase on the new device. To do so, please contact us and provide the date of purchase and what tour or game you have purchased.
You require internet connection to download and install the tour. Once the tour has been downloaded to the device, you do not require internet connectivity for the tour to work. You do require GPS connection to accurately trigger tour points.
If you have an iPhone on the same Apple account, then select Restore Purchases from menu accessible from the front page top-left button.
If you have Android, you need a code to redeem the purchase on the new device. To do so, please contact us and provide the date of purchase and what tour or game you have purchased.
Yes you can use custom maps. This is a premium feature in BETA. Contact us to discuss.
When purchasing products directly via the Creator CMS, you can use credit card or debit card. If you want to use another payment method such as bank transfer, please contact us to request an invoice. Please provide your username and product you wish to purchase as subject line.
Yes the Creator CMS® is built specifically for multilingual tours and games. You select your main language when creating your project and add other languages via the project settings. Ensure each tour point has translations for each language. These can be both text and audio.
The users device will default to their device language for the app User Interface, but tour language can be selected by the user when downloading the tour.
Tour and game content can be created in multiple languages, but the user interface of the Creator CMS® is only available in English.
Yes you can use the ‘Create Path” tool to draw a line on the map which will be shown in the app.
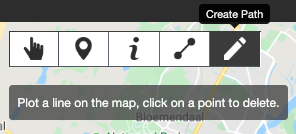
Example path from Reykjavik Art Walk App

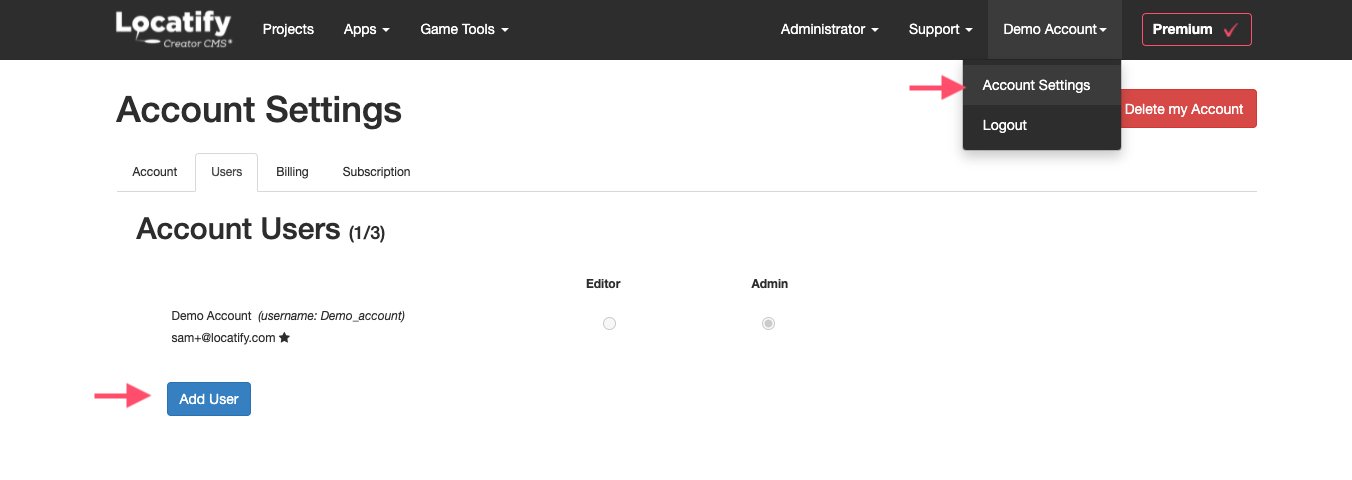
All Premium licenses include the ability to add multiple users to a Creator CMS publisher account. This means users linked to the same publisher account can view and edit project content, publish projects, and view scoreboard and reports.
If the person you want to collaborate with does not have an account already, you can add them via the Creator CMS > Account settings > Users tab.
Note: Each account has a specified billing user who is the user who upgraded the account.
Plan Limits
Free Plan: 1 x user per account
Teacher License: 1 x user per account
Multiple Project license: 3 x users per account
Branded App: 5 x users per account
Admin users vs Editor user
Admin users can manage additional users and can control all content on the publisher account. Guide users can only view and edit their own content.
Sharing login credentials with other users
It is not recommended to share your login credentials with other users. This may result in content not being saved correctly and can result in the termination for your account.

Yes, this a premium feature that can be found under Settings – General Settings.
Here you can export your tour point locations and content.

To import a tour, click on New Project on the front page. Fill in the title and language and click on the Import icon under “Treasure Hunt Game” or “Outdoor Tour”.
Please note if you are using Premium Content Templates, only tour point locations will be exported, and not tour media content.


The beacon’s transmission power (Tx) can be configured from 0 to 7 in the app that you most likely got from your beacon provider. The higher the transmission power, the more accurate it is, but it will also drain the battery quicker.
Most accuracy is gained with power level 7, but often power level 3-4 is sufficient. We suggest starting testing with Tx power at maximum and then you may be able to reduce it down to 3-4 after your tests. The major, minor and UUID properties of the beacon need to be registered in the Locatify CMS.
See this guide from our friends at Kontakt.io for more information on transmission power.
_iphone13midnight_portrait")
In the Locatify CMS, a “project” refers to an individual tour guide or treasure hunt game that can be published to TurfHunt or SmartGuide apps.
A published project is defined as a tour guide project or a treasure hunt game that is actively published (and available for download) on TurfHunt or SmartGuide apps.
Projects can be unpublished and republished at anytime and all premium licenses include multiple draft (unpublished) projects.
Yes, with any paid plan, you can link users or accounts together to collaborate on projects. This is suitable for organizations where multiple users need access to collaborate on projects.
- “Editor” permission allows a user to share a publisher account, but the Editor can only the content that they have created.
- “Admin” permission allows the user to view and edit all of the content linked to the publisher account. This includes editing and publishing project and app content, access to the question bank, game instances, and uploaded game content.
To invite someone to your account:
We only charge VAT on sales for customers based in Iceland. For all other sales, local taxes and import fees are not included in the prices.
(This article is about Branded apps. For more information on getting your own branded app, see here)
There are multiple monetisation strategies available but the main one is using in-app purchases to sell app content such as Tour Guides or Treasure Hunt Games. To accept in-app purchases, we suggest you setup your own App Store and Play Store developer accounts. we can assist with this process.
Secondary monetisation strategies could include sponsored content, ad revenue and selling third party products via the app.
Yes, you can use HTML to add a hyperlink to open a URL. This can be done in a tour or game and in any template where there is a text field or input field for HTML.
To embed a link into a project, it may take this form:
<a href=”https://example.com/”>Example</a>
In this case, “example.com” is the website you want to link to and “Example” is the title you want to have as a preview.
A draft project is a tour guide or treasure hunt game project which has not been published to an app.
Draft projects can be updated and saved without publishing to an app.
Once you have built your project and tested the project sufficiently, you can publish the project so it is available for use on TurfHunt or SmartGuide apps.
It takes a few seconds for the app to detect a beacon that’s in range in order to trigger the associated content. You can change the default broadcast frequency (advertising interval) in the beacon from the default 650 ms to 350 ms to improve it slightly, but it still takes a few seconds for the app to get a beacon reading.
Under the Game settings you can specify the type of game, the maximum number of players and how players will join the game.
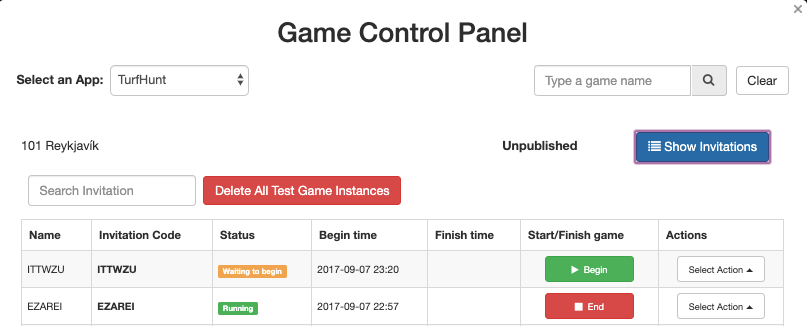
Games created on the free plan will always be accessible via the app’s home page, but with a premium license you can restrict access if you want, so that players need an invitation code to join the game.

To make your own custom invitation code, start by going to the Game Control Panel. Click on Create New Game Instance and Custom Invitation Code and type your invitation code.

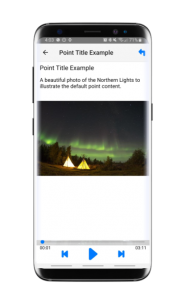
A point (or “station” for indoor projects) contains the information that will be shown when the point is triggered in the game or tour. By default, your point can include a title, description, image, audio and video.
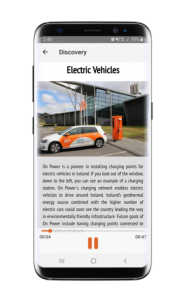
You can further customise this content to include additional types of media content or change the layout and design to match your branding. The templates work similar to building a web page, using HTML and CSS.
All premium licenses include a selection of common content templates and the option to customise or create your own templates. If you have a design in mind, you can contact us to have a custom template built for you.
Please note:
- Web based content may require internet connection to display properly (e.g YouTube videos or Spotify links)
- Media elements used in Custom Templates are not saved to the Media Manager
Default Example
Custom Example
It depends on how many images or audio files are used. A typical game is about 1-5 MB in size having something like 20 points. It gets bigger if you have multiple images per treasure and especially if you are using audio as well.
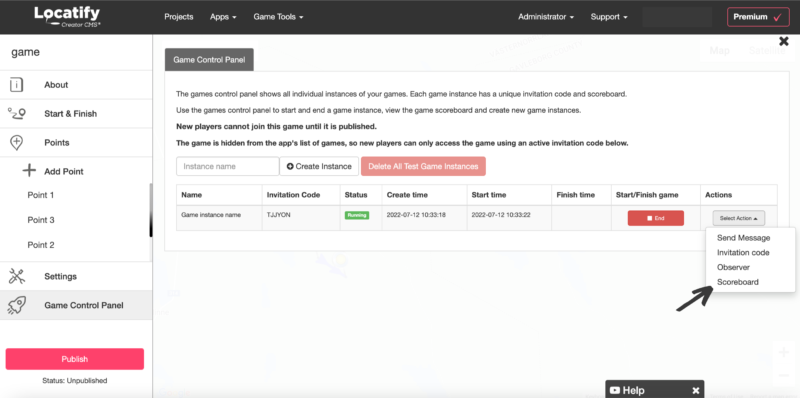
Go to your Game Control Panel and click on “Action” on the right side of the game instance where you want to see the scoreboard.
We offer a variety of licenses to meet the needs of different customers. You can see our Plans & Pricing here.
(Prefer to watch the tutorial instead? Click here)
1. Create a new project
If you haven’t done so already, make a free account with us and login. You’ll be taken to a dashboard from which you can create projects.
Start by Selecing New Project. Then give your project a name, choose your primary language (you can add others later), and select Tour Guide.

2. Add a point
You can add and manage your points from the left panel.
Select Add point and click again on the map to place it where you want it. The green area around the point visualises the triggering radius.
Click on the point itself to add information to it.

3. Add point content
This is where you add the content that your users will see and hear in the tour.
At the top you can:
- Insert a thumb image, like a logo or a photo.
- Add more languages (just remember to provide translations at all points).
- Add audio or video that plays when this point is activated.
- Set the radius (the radius is the distance from the point that your users have to come within to trigger the points’ information). You can also set a more detailed position with latitude and longitude.
- Choose if you want your point to be a destination point or information point (see the difference here).

Popup page
On the same page you’ll find the settings for the Popup page. If you select Auto popup it means the page will automatically open when the point is activated.
Here you add a title to the point and some description text.
If you have a Premium license, you can also use content templates to further customise your point. You can embed web content such as a YouTube video, a Spotify playlist, show store opening hours, and social media links.

4. About section
Now let’s go to the About section on the left side panel to get your tour ready for testing and publishing. Here you find the information that your users will see when they first access your game in the Locatify SmartGuide app.
Start by giving your tour an image or a logo. You can also upload an audio or video file if you want an introduction before the user downloads the tour (in order to reduce download time for your users, keep any video files uploaded under 30 seconds).

Introduction page
Also in the About section is the Introduction page. There you can modify your title, add a subtitle, and also add a description of the tour.
With a Premium license, you can choose an extended layout template for more customisation, like adding additional slides, and changing the colour of the background, text and title.

5. Settings
Now let’s check out the settings. Here you can decide if you want your tour to be accessible via the app’s home page, or if you want to restrict access, so users need an invitation code to join the tour (Premium feature).
Premium licenses also allow you to import pins or export the game.

Map & Location settings
Under Map & Location settings you can choose if you want the content to automatically trigger when the user is in range or if you want it to activate manually. If you choose the manual activation the tour is virtual and can be therefore accessed from anywhere.
You can also choose if you want to monitor the users’ location even when their device is locked, as well as adding a custom overlay to your map.

6. Add directions to Start
Click on Start on the left panel to give your users a directions to start message for when they begin the tour.

7. Testing
When you’re ready to test your tour, select the Publish button on the bottom of the left side panel.
Now click on Test on device. In this test mode you can test the tour content without the need for going on location. If you want to test the accuracy of the tour locations we recommend that you test it on location as well.
Keep in mind that a test tour can only be used once, so if you need to test the tour on multiple devices, you will need to republish it for testing again.

Create Test Version
Download the Locatify SmartGuide app to your mobile device from the App Store or Play Store if you haven’t already. Select Create Test version.
From within the Locatify SmartGuide app, you can redeem your test project with either the QR code or the invitation code displayed.


8. Publish!
When you’re done with testing and ready to publish, select Publish to app on the left. Select the app for publishing (SmartGuide) and when you’re ready, press Publish.
Now have fun creating!

Yes, if you use a transparent PNG “In-active” image for your station, your station will not be visible on the floor plan.
Yes, when adding a Station to the Floor Plan, simply select the Treasure tab and add your game challenge to the station. This will automatically turn your indoor project into a treasure hunt game.
Go to the game scoreboard by clicking on “Action” on the right side of the game instance where you want to see the scoreboard.
Click on Scoreboard, and when it opens, click on Edit behind the score of the player where you want to alter the score.

A station is what houses all of the information about a particular point of interest in an indoor tour or game.
These are areas or points of interest that people visit during your game/guide and they are represented on the floor map as an image. Each Station has separate images for Active, Inactive and Completed (if used in a game). You can use transparent PNG images if you want to hide the station location from the map.
A station can contain various media files and game challenges, and BLE beacons can be associated with the Station to trigger the content automatically.
See our FAQ on How to add a Station to a floor or watch a tutorial here
A floor is an area in indoor projects, on which you place content for your users to interact with. This is where you add and edit your floor plan and all of the information associated with it. You can add multiple floors to your project, but you need at least one floor and on it, you can put a floor plan graphic and stations that will appear on the top of the floor plan. If you skip the floorplan and just have stations, then the stations are shown as a list in the app.
Each floor would usually relate to a room in a building, multiple buildings in an area or the floors may be geographically unrelated.
See or FAQ post on How to add a Floor in an Inside project or watch the tutorial here.
A station contains the information that will be shown when the station is triggered in the game or tour. By default, your station can include a Title, Description, Image and Audio or Video.
You can further customise this content to include web content, additional types of content or change the layout and design to match your branding. The templates work similarly to building a web page, using HTML/CSS. Contact us for developer support documentation.
All Premium licenses include some example templates and the option to customise or create your own templates. If you have a design in mind, you can contact us to have a custom template built for you.
Please note: web based content may require internet connection to display properly and media elements used in Custom Templates are not saved to the Media Manager.
This will depend whether the game is published to show in the app or is only accessible via an invitation code (managed in settings). The player can find the game via the app home page (list or map) or they can enter the invitation code to access a specific game.
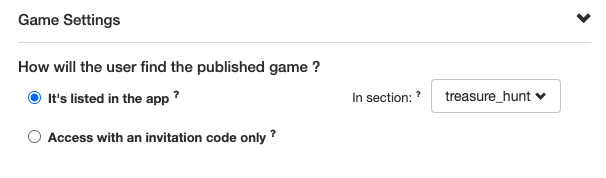
It’s listed in the app:
The players enter the Invitation Code in the app, download the game, join and enter their player name. The player will see a screen with a list of all other players. Once all players have joined, the game master will start the game and the player will be shown the first challenge location and directions to start.

Access with invitation code only
The players enter the Invitation Code in the app and download the game in their preferred language before joining and entering their player name. The game begins and the player will be shown the first challenge location and directions to start once they have entered their player name.

Did you upload a custom pin and can’t see it on the map in the CMS? Don’t worry, even if you can’t see it in the CMS, you will see it in the app (TurfHunt if it’s a game, SmartGuide if it’s a tour) when you publish the project. If you’re not sure, test your project now and have a look!
A point contains the information that will be shown when the point is triggered in the game or tour. By default, your point can include a Title, Description, Image and Audio or Video.
You can further customise this content to include web content, additional types of media or change the layout and design to match your branding. The templates work similar to building a web page, using HTML/CSS.
All Premium licenses include some example templates and the option to customise or create your own templates. If you have a design in mind, you can contact us to have a custom template built for you.
Premium Templates:
- Image Carousel
- Open a URL
- Shop Contact/Opening Hours
- Embed a YouTube video
- Embed a Spotify Song/Playlist
Please note: web based content may require internet connection to display properly and media elements used in Custom Templates are not saved to the Media Manager.
A Multiple Projects license allows a user to publish up to 5x treasure hunt games to TurfHunt or tour guides to SmartGuide. The license allows for 5x projects to be published at any one time. This means that you could have a combination of games and guides published, so long as the max number is 5x. You could have multiple draft projects and switch between them by un-publishing one project and then publishing another one.
A Multiple Projects license includes the ability to add up to 3x account users to collaborate on the projects. Each project can have an unlimited number of challenges or tour locations. For optimal user experience and file download size, it is suggested to keep these under 50 x locations and to compress media files.
View Plans & Pricing for more options. If you require more than 5x projects, contact us to discuss your options.
Applying this setting will rank players on the game scoreboard in order of the speed at which they complete the game. Game admins can specify a time penalty for using challenge hints.
A “game instance” refers to a published game with its own scoreboard and invitation code. A published game can have multiple “game instances”, for example a weekend game might have separate game instances for Saturday and Sunday. Each instance would have a unique invitation code which players use to join the correct game, and players will be ranked on the scoreboard for that day/game instance.

What if I have multiple Game Instances?
If your game is published “to show in app”, players will join the latest game instance which has been created
Yes, SmartGuide features both indoor and outdoor tour guides. Indoor tour guides can use a floor map image with tour locations added to the map called via “stations”. If you want to use BLE Beacons to trigger the tour content automatically, you can attach BLE Beacons to the stations. If no location technology is used, the stations can be clicked on to play the associated media and if no floor map is used, the stations will be shown in a list.
You have the option to “Show tour in-app” in the Settings when building a tour. This means anyone can see and download the tour from the app. Alternatively, you can choose to not show the tour in-app, and you can then associate a tour with a voucher code that will unlock the tour.
Once the app is downloaded, a list of published tours or games is shown and the list is sorted by tours/games closest to your current location.
Did you just notice a mistake in your published tour or realised you placed a point in the wrong place? No worries, you can fix your mistake or even add to your tour and republish it again. Simply make whatever change you want and press Republish.
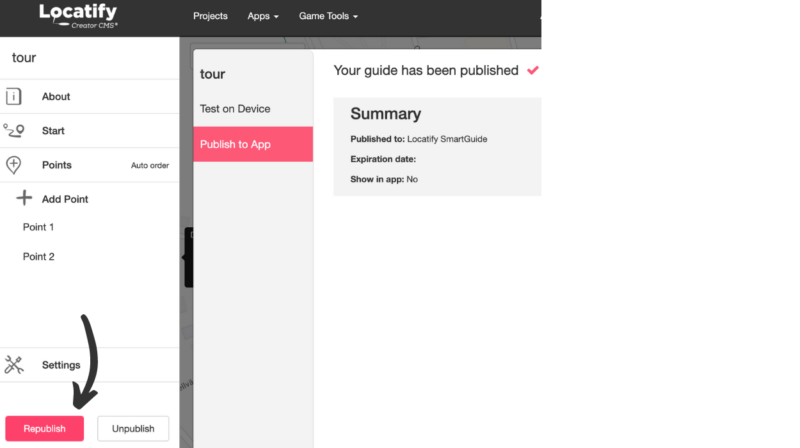
Then go through the publishing process again; Test on Device and then Publish to App. Your tour should now be updated!
The Locatify Creator CMS® is built with a combination of open source software and propriety software. The source code is owned by Locatify EHF and is licensed to end-users.
The Creator CMS® is integrated with GNSS (GPS), Google Maps, OpenStreetMaps, BLE Beacons and Ultra-wideband (UWB).
Yes! From the Games Control Panel, you can view the scoreboard for each game and each instance of said game.
In the scoreboard you can view; player names, score and email addresses (if these were collected) and uploaded photo content (per challenge, for the entire game or per team).
This video shows you how to create an outdoor treasure hunt game using the Locatify Creator CMS.
This video shows you how to create an outdoor Tour using Locatify Creator CMS.
This video shows you how to create an indoor tour or game using Locatify Creator CMS and BLE beacons. Help is also provided in the CMS throughout the creating a new indoor tour process.
How to Make an Indoor Tour or Game Guide using iBeacons and Creator CMS
(This article is about a premium feature. For plans and pricing, click here)
Custom pins are a great way to visually represent your locations, sponsors or to match your brand.
To add a custom pin to your project, start by clicking on your point and then Custom pins.
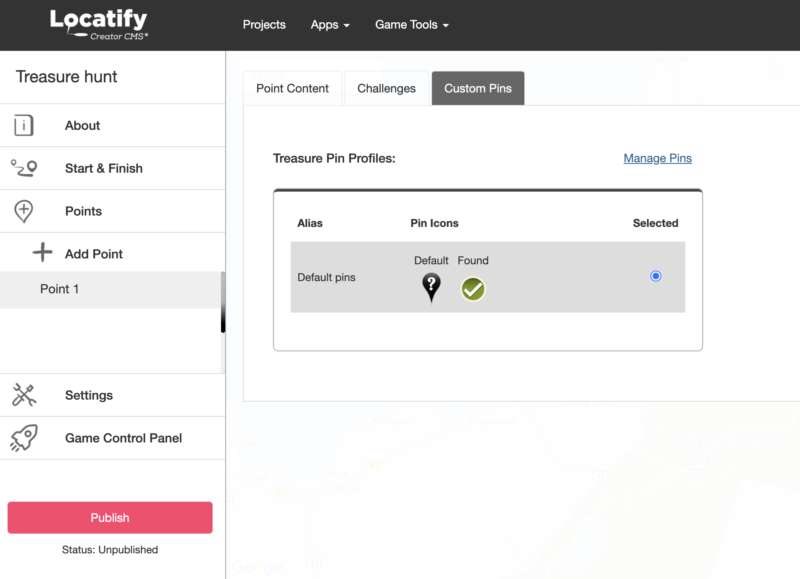
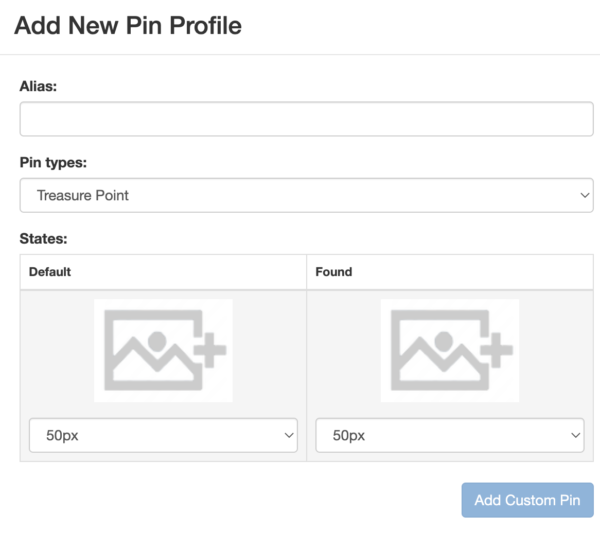
Click on manage pins and Add New Pin Profile

Here you fill in the Alias (name of the pins), choose what type of point your pin is for, and add the pin image (under States). You can use different images depending on if the point has been found or not and change the size of the pins.
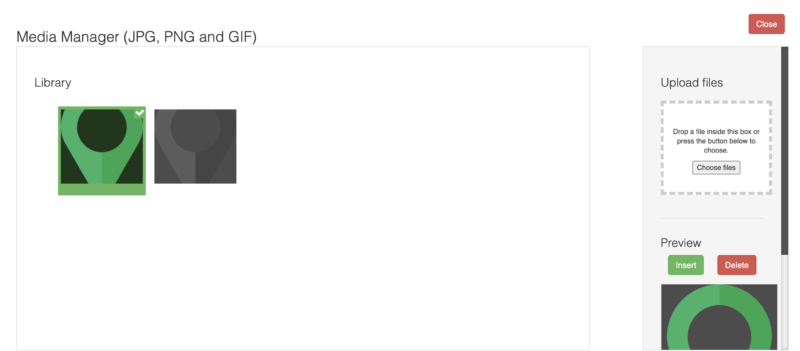
In the media manager, select the pins you want to use (in this demo the images have already been uploaded) and click Insert. You can upload new pin images from your computer by clicking on Choose files under Upload files on the right.
Now click on Save to save your pin profile.
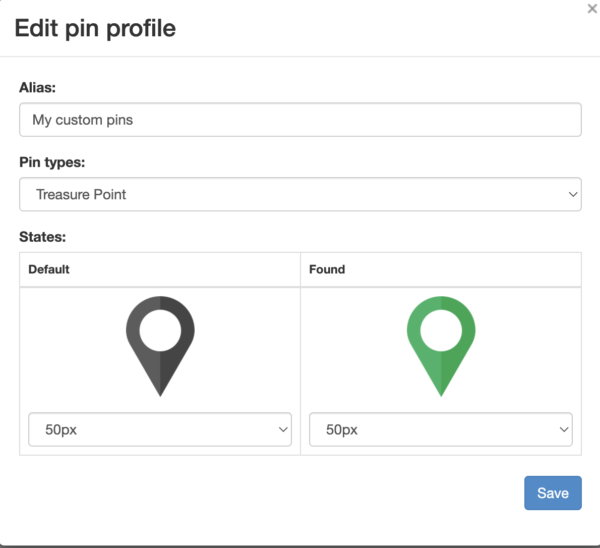
Make sure your new pins are selected for this point and you are good to go!
*Please keep in mind that these pins will not show up on the map in the CMS but will be visible in your game once you publish it to the app.

Players are given the option to save the coupon to their devices camera gallery. If they save the coupon to their gallery, they will be able to view the coupon once they have completed the game.
You can use HTML tags to change the formatting of text in your content templates for tours and games. For example, put your text in between the appropriate tags to enable formatting such as: bold and italic text formatting or to add a line break:
For more information on HTML formatting, see here.
Here is an example of a link that you can add to your Game Over Message and or to your tour or game description. Place it in between the quotation marks like here:
<a href=“http://www.example.com/”>Click here</a>.
(Prefer to watch this tutorial? Click here!)
1. Create a new project

If you haven’t done so already, make a free account with us and login. You’ll be taken to a dashboard from which you can create projects.
Select New Project, give your project a name, choose your primary language (you can add others later), and select Indoor Project.
2. Edit (project information and settings)
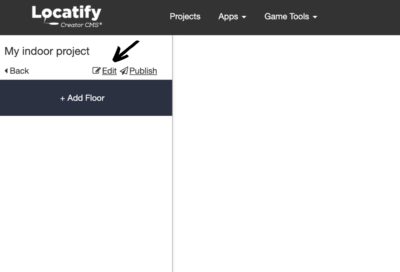
Let’s start with the project information and settings. Click on Edit (see arrow).
Content
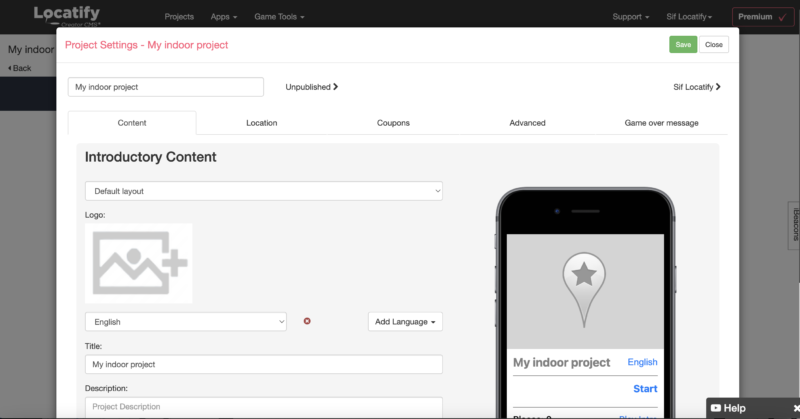
Let‘s start with the content. Here you find the information that your users see when they first access your tour in the app.
Here you can:
- Give the project a name that will only be visible in the CMS.
- Give your project an image or logo.
- Modify your title, add a subtitle if you’d like, add a description of the tour and give your location a name.
- Upload an audio or video file if you want an introduction before the user downloads the tour. To reduce download time for your users, keep any video files uploaded under 30 seconds.
With a Premium license, you can choose an extended layout template for more customisation like adding additional slides, and changing the colour of the background, text, and title.
Location
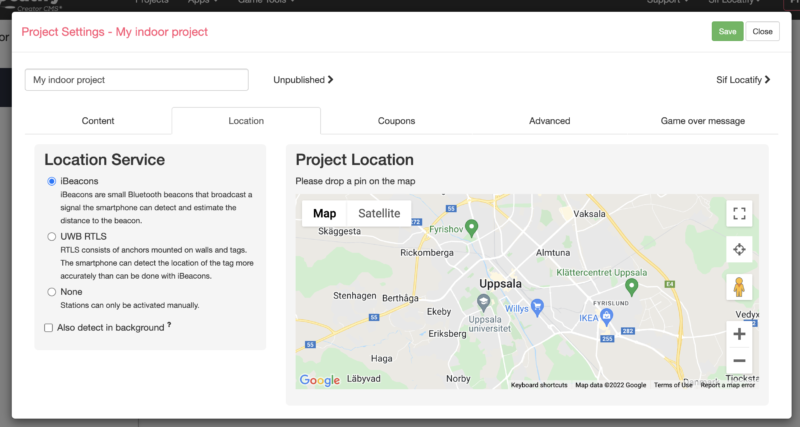
Under the Location tab you have the Location Service, where you select which location technology (if any) you’re using in this project. The location technology is what activates our stations and floors and unlocks their content.
You have a few options:
iBeacons: The beacons are small battery-driven devices that can easily be placed around the venue, near the subject the user would be standing in front of when the app automatically activates the content when the user is within a certain range of the beacon. The beacons are registered in the CMS and associated with the stations, or floor plans, that they should activate.
Ultra-Wideband (UWB): This is for very precise location detection. The UWB installation consists of anchors mounted on walls and tags for the objects you want to track. This is a pricier alternative to iBeacons that needs infrastructure (ethernet) to work. For more information on the difference between UWB and Beacons see here.
No location service: This means that the stations are activated only by pressing on them on the screen (making it a virtual project).
Coupons
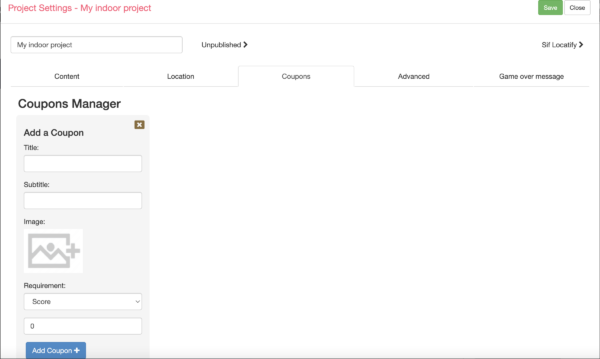
Here you can upload and manage coupons. Keep in mind that coupons are only rewarded to users if the project is set up as a game.
Advanced
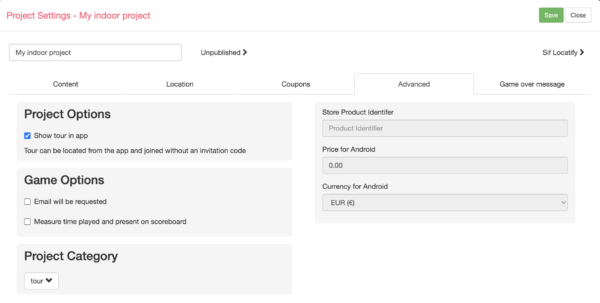
Under Project options you decide if you want to show your project in the app. If you don’t want it to be visible, then users will need an invitation code to access it.
Under Game options you have options that only apply if your project it set up as a game. You can select if you want to request users’ email when they join the tour and if you want your game to be time-based.
In Project Category, you choose if your project is a tour (meaning it’ll be published in SmartGuide) or treasure hunt (therefore published in TurfHunt).
Game over message
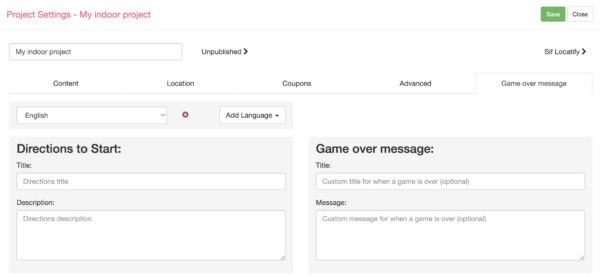
Click on Game over message to give your users an optional game over message if your project is set up as a game.
And a directions to start message for when they begin the project.
Now click on Save and exit.
3. Add your first floor
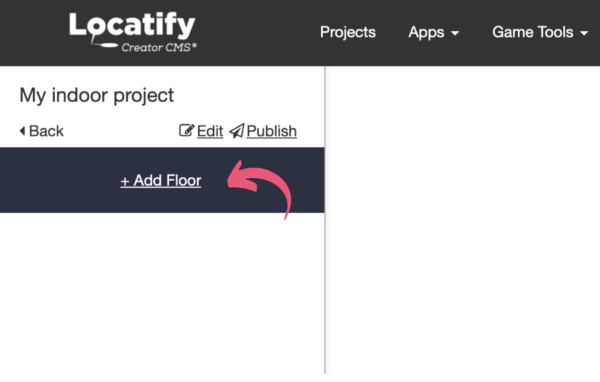
Indoor projects consist of floors and stations. You need at least one floor and on it, you can put a floor plan graphic and stations that will appear on the top of the floor plan. If you skip the floorplan and just have stations, then the stations are shown as a list in the app.
Start by clicking on Add floor on the left side panel.
4. Floor info
Content
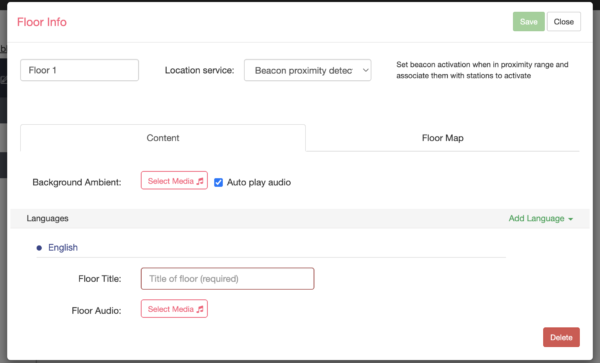
Here you can:
- Name the floor – this will only be shown in the CMS.
- Upload background audio to play on a loop when this floor is active. Check the box next to it if you want the audio file to start playing automatically when the floor is activated.
- Add languages.
- Insert the floor title for each language the tour will be available in – this title will be shown in the app.
- Upload floor audio which will be activated when a user enters the floor. It will then stop when a station is activated.
Floor plan

Here you can upload a floor plan graphic where your station graphics will be placed upon. (Remember, if you just have stations and no floorplan you can skip the floor map graphics, and then the stations are presented in a list in the app.)
You will also need to enter the size of the floor in meters, width and height.
Drag the square to define the margins of the floor. The highlighted area should match the measurements you inserted above.
Click on save and close so you can continue with the stations.
5. Add a station
Start by clicking on the + next to Stations on the left hand panel.
Now click again on the floor plan to place it where you want it, then click again on it to drag it to the right position and size it correctly.
6. Add Station content
Now scroll down to the Station content. Under the Basic tab you can:
- Name the station in the CMS.
- Upload your own custom active and inactive images that represent the station on the floor map.
- Add more languages.
- Give your station a title that will be visible to the users (this is required).
- Upload the audio guide for the station, it will start playing automatically when the station is activated.
And on to the information layout. Here you can choose to have the popup window display automatically when the station is activated. You can either use the default layout with only description text or click on Template and edit content to customise the look.
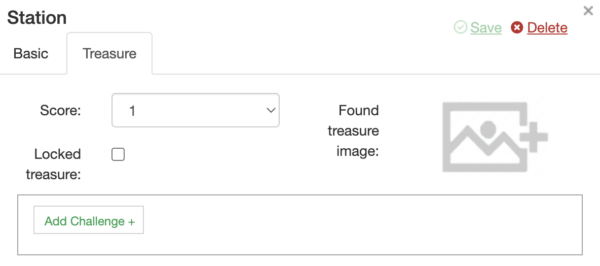
Click on the Treasure tab and add a challenge if you want your project to be set up as a game.
Now click on save and close this station.
7. Adding a beacon to your station
Add beacon to station
(If you want to continue your project without location technology, skip this part.)
If you want to use beacons in your project, start by clicking on the name of the Station you want to add a beacon to and then Add Beacon to Station.
This will open a drawer on the right side of the screen, where you start by clicking on Add beacon to give your beacon a title.
Add beacon
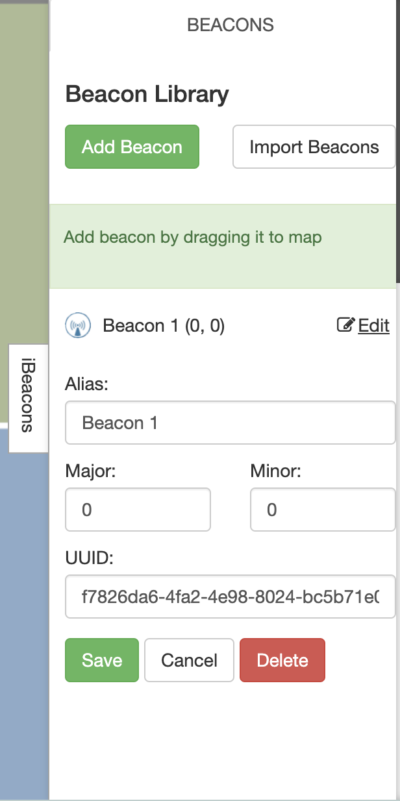
(See more about UUID, major and minor numbers here)
Once you’ve clicked on Add beacon, then give your beacon a title (or Alias).
The UUID field will autofill with a number from Kontakt.io (the provider we usually work with). If you’re using beacons from another provider you will have another number so just copy it and paste it here or insert it manually.
Insert the Major and Minor numbers as you see them in your beacon app or on your beacon.
x- and y-axis & radius
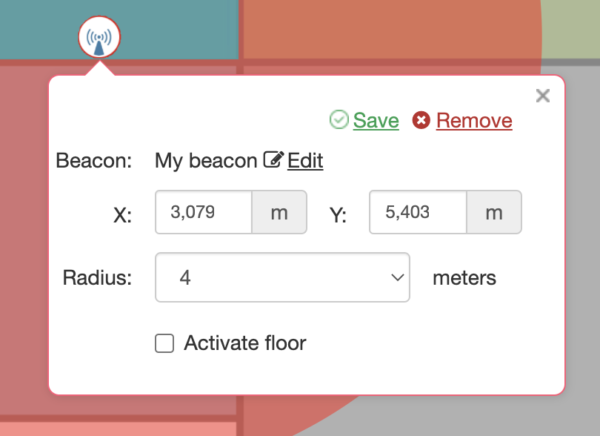
Here the x- and y-axis fields autofill in regards to where you drag the beacon, but you can also fill in these numbers manually.
Below you set the radius. The proximity measurement is best within 1-2 meters distance from the beacon, and accuracy will decrease the further away you go.
iBeacons proximity is normally divided into immediate (within a meter), near (within 6 meters) and far (within 30 meters). Please keep this in mind when selecting a distance for your beacons.
You can also choose if you want this beacon to activate the floor or only this station. If you choose floor activation, it will also appear on the side panel to the left, under Floor Activation Beacons.
Click save and exit.
8. Testing project
Now we’re ready to test our project.
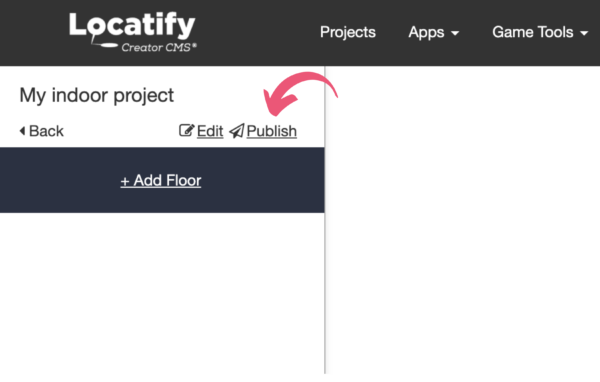
Select Publish.
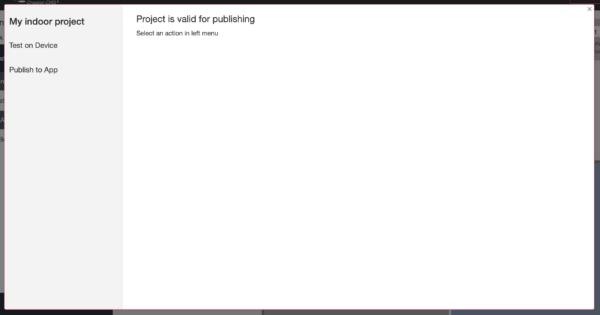
First, you should try your project on a mobile device by publishing it for testing. In this test mode, the project is only available to download in the app using a test code. If you are using game elements and locking stations so they can’t be opened until the user is at the location (using Beacons or UWB), then test games allow you to cheat by opening the stations without going there.
Click on Test on Device.
Test on Device
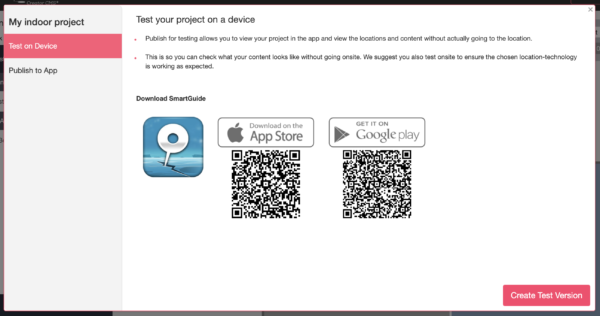
Now, download the Locatify SmartGuide app to your mobile device from the App Store or Play Store if you haven’t already.
And select Create Test Version.
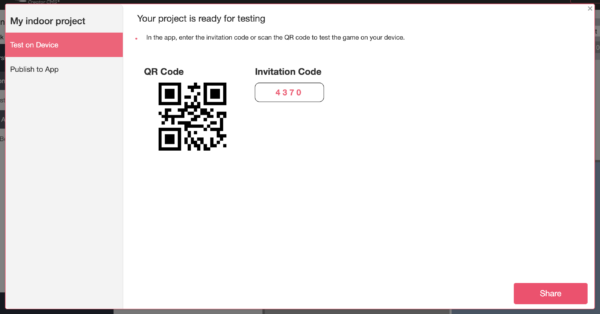
From within the Locatify SmartGuide app, you can redeem your test project with either the QR code or the invitation code displayed here.
Please note we only allow a test code to be redeemed on one device. If you want to redeem it on another device, you must publish it again for testing.
9. Publishing

When you’re done with testing and ready to publish, select Publish to App and select which app you want to publish to. If your project is set up as a game, you should select TurfHunt, and if it’s a tour, you should select Locatify SmartGuide.
Now click Publish. Congratulations, you’ve just published an indoor project!
The Rewards feature is a great way to integrate digital items or discount vouchers/coupons to players of your game. This can add another level of gamification or be used to encourage players to visit certain locations.
After upgrading to a premium license, upload your reward to the Rewards Manager. Once you have created the reward, you can specify how the player can earn the reward.
You can select:
1. Whether or not you want it to be awarded for a player reaching a certain total score (Eg. 10 x points)
2. Or award it to a player for finding a certain number of challenge locations (Eg. after finding 5 x locations)
If your Treasure Point was near a cafe, for example, you could strike a partnership with the cafe and reward your players with a coupon from the cafe itself.
You can import a game or a tour you have exported to reuse the points and content.
To import a project, click on New Project on the front page. Fill in the title and language and click on the Import icon under “Treasure Hunt Game” or “Outdoor Tour”.
Yes they can! When setting up your indoor project, select:
Project Settings > Location > Location Services > “None”.
This will allow you to add Stations (zones) to your map which will be clickable to trigger the station media to play. If no map is used, the stations will be shown in a list.

(Prefer to watch this tutorial? Click here!)
1. Create a new project
If you haven’t done so already, make a free account with us and login. You’ll be taken to a dashboard from which you can create projects.
Select New Project, give your project a name, choose your primary language (you can add others later), and select Treasure hunt game.

2. Add treasure point
You can add and manage your treasure points from the left panel here.
Select Add point and click again on the map to place it where you want it. The green area around the point visualises the triggering radius.
Click on the point itself to add information and challenges to it.

3. Add content
This is where you add the content that your players will see and hear in the game.
At the top you can:
- Insert a thumb image, like a logo or a photo
- Add more languages if you want (just remember to provide translations at all points and challenges)
- Add audio or video that plays when this point is activated
- Set the radius (the radius is the distance from the point that your players have to come within to trigger the points’ information) or set a more detailed position with latitude and longitude.

Popup page
On the same page you’ll find the settings for the Popup page and you can choose if you want it to automatically open when the point is activated.
Here you add a title to the treasure and some description text.
If you have a Premium license, you can use content templates to further customise your point. For example, you can embed web content such as a YouTube video, showing store opening hours, and social media sharing.

4. Add Challenge
Now let’s add a challenge! Click on Challenges next to Point Content at the top of the page.

Start by attributing a score for finding this treasure location and then select Add a challenge.
Choose your challenge type and don’t forget to select a score for completing the challenge successfully.


5. About section
Now let’s go to the About section on the left side panel to get your project ready for testing and publishing. Here you find the information which your players will see when they first access your game in the Locatify TurfHunt app.
Let’s start by giving your game an image or a logo. You can also upload an audio or video file if you want an introduction before the player downloads the game (to reduce download time for your players, keep any video files uploaded under 30 seconds).

Introduction page
Let’s continue on to the Introduction page, where you can modify your title, add a subtitle if you’d like, and also add a description of the game.
With a Premium license, you can choose an extended layout template for more customisation, like adding additional slides, and changing the colour of the background, text and title.

6. Settings
Now let’s check out the Settings. Under the General Settings you can decide whether or not to hide players’ positions on the map, choose if you want to collect players’ email addresses upon entering the game and import pins or export the game.

Game settings
Under the Game settings you can specify the type of game, the maximum number of players and how players will join the game.
Games created on the free plan will always be accessible via the app’s home page, but with a premium license you can restrict access if you want, so that players need an invitation code to join the game. You can also change the game play mode and enable time-based games.
Rewards
Another premium feature are game Rewards, which are managed here. With Rewards you can reward players for finding a specific treasure location or earning a certain score.
Common uses for rewards are local discount vouchers or collectible digital items. This can be a great way to integrate local business sponsorship.
Map & Location settings
Under Map & Location settings you can choose if you want the content to automatically trigger when the user is in range or if you want it to activate manually. If you choose the manual activation the game is virtual and can therefore be played from anywhere.
You can also choose if you want to monitor the players’ location even when their device is locked, and add a custom overlay to your map.

7. Directions to Start and Finish
Click on Start & Finish on the left side panel to give instructions to your players on how to begin the game and add a custom message to your players for when the game has finished.

8. Testing
Now we’re ready to test our game. Select the Publish button on the bottom of the left side panel.
First, you will want to test your game, so click on Test on device. In this test mode you can test the game content without the need for going on location. But if you want to test the accuracy of the challenge locations it is recommended to test the game on location as well.
Keep in mind that test games can only be used once, so if you need to test the game on multiple devices, you will need to republish for testing again.

Create Test Version
Now, download the Locatify turf hunt app to your mobile device from the App Store or Play store if you haven’t already. Select Create Test version.
From within the Locatify Turfhunt app, you can redeem your test project with either the QR code or the invitation code displayed.


9. Publishing!
When you’re done with testing and ready to publish, select Publish to app on the left. Now you select the app for publishing (TurfHunt) and the game duration. You can also click on Game Settings if you need to go back to change the maximum number of players. When you’re ready press Publish.
Now have fun creating!

Forgotten/lost password
From the Creator CMS login page > press “Forgot your password?” > enter your username or email.
You will then receive an email with a link to reset your password. Once you have entered a new password, you will be able to login.
Please note: this process is not applicable for account which have been created using Facebook or Google social accounts.

Update an old password
From the Creator CMS dashboard > Account Settings > Account > New Password. Enter your new password, confirm the new password and then press “Submit”.

A “branded app” refers to an Android and iOS mobile app which has been customised with a customers branding assets. Branded apps are either fully-custom apps or more commonly “white-label” (or skinned) apps, which have been built for a specific purpose (such as a museum audio guide) and are easily rebranded. The common branding elements include the launch icon, splash (loading) screen, banner logo and colour scheme.
Alternatively, “Locatify Apps” are apps with Locatify branding, which are used to host content from multiple creators. Example Locatify apps are; TurfHunt for hosting treasure hunt games and Locatify SmartGuide for hosting location-based tour content.
A white-label app (or branded app) is a mobile app which has been created for a specific purpose and which can be easily branded. Locatify white-label apps have a variety of templates for specific purposes and are built in a way that makes it easy to add new features and further customise the design.
Examples include the Automatic Museum Guide and Automatic Tourist Guide.
Commonly branded elements include the app icon, banner, banner logo, loading screen, menu items, menu icons, buttons and additional app pages.
To request a Branding Guidelines document and see if a branded app is suitable for you, contact us.
The cost of a branded app is determined by the features, project requirements and purpose of the app. Locatify branded app standard pricing model includes a once-off set-up fee and a monthly subscription.
Contact us to discuss your requirements and get a quote.